Web of Things Arduino: Blinking LED
The most simple Web of Things use-case. A simple LED which can be turned off and on via a REST API.
Prerequisites #
- Windows, Linux or MacOS
- ESP32
- Installed Arduino IDE with Web of Things library
- WiFi Router
- 5mm LED (Color is not important)
- Mini Breadboard
- Male to female DuPont jumper cable
- Resistor 100Ω - 150Ω
- Installed Insomnia or another REST Client
Before you follow this tutorial you should read more about Web of Things in order to understand what it is used for
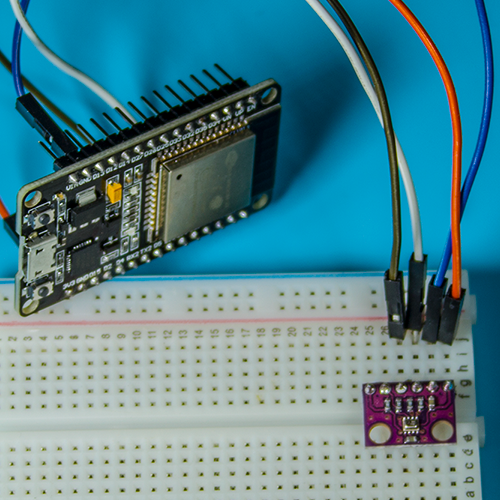
Connect the LED to your ESP32 #
Connect your LED and resistor according to the diagram. Best practice is to use the correct resistor value for your LED. You can calculate the needed resistor value. Since you only use the LED for an example application, you don’t need to be so precise. Keep in mind that not using the ideal resistor value may reduce the lifetime for your LED. Even though using a 100Ω - 150Ω resistor should be fine for most 5mm LEDs. These LEDs are generally also very inexpensive. I used a 130Ω resistor in my test circuit.
Create a new project in the Arduino IDE #
Create a new project under File → New in the Arduino IDE.
Copy the LED application code #
Copy the LED application code into the Arduino IDE sketch file.
Change the configuration #
In order to be able to connect to your router, you need to change the variables ssid and password.
Flash the code #
Open the serial monitor under Tools → Serial Monitor before you flash the code.
Now flash the code under Sketch → Upload.
When the flashing is done, the ESP32 should restart. If this doesn’t happen, push the EN button yourself. The ESP32 should blink while trying to connect to your WiFi router. When the connection is successful the light should be constant instead of blinking. You should be able to see the IP address of the ESP32 in the Serial Monitor. Copy this IP address, we need it to access the REST API.
Test the API and circuit #
Once flashed, we should test our circuit and API.
Get the WoT TD
Open Insomnia or your REST Client. Create a new HTTP GET Rest in your client. Give this request some meaningful title, such as Get TD.
Use the URL http://[YOUR_IP]/.well-known/wot-thing-description. Replace [YOUR_IP] with the IP of your ESP32.
The IP address should be logged in the serial monitor.
Send the request and wait for the response. The response should be a valid WoT TD. It should look like this
    {
      "id": "lamp123",
      "title": "My Lamp",
      "@context": [
        "https://www.w3.org/2019/wot/td/v1"
      ],
      "description": "A web connected led",
      "base": "http://192.168.178.29/",
      "securityDefinitions": {
        "nosec_sc": {
          "scheme": "nosec"
        }
      },
      "security": "nosec_sc",
      "@type": [
        "OnOffSwitch",
        "Light"
      ],
      "forms": [
        {
          "rel": "properties",
          "op": [
            "readallproperties",
            "writeallproperties"
          ],
          "href": "/things/lamp123/properties"
        }
      ],
      "properties": {
        "state": {
          "type": "object",
          "title": "On/Off",
          "description": "Whether the lamp is turned on",
          "@type": "OnOffProperty",
          "properties": {
            "state": {
              "type": "boolean"
            }
          },
          "forms": [
            {
              "href": "/things/lamp123/properties/state"
            }
          ]
        }
      },
      "actions": {
        "toggle": {
          "title": "Toggle",
          "description": "toggle the lamp on/off",
          "@type": "ToggleAction",
          "input": {
            "type": "object",
            "properties": {
              "state": {
                "type": "boolean"
              }
            }
          },
          "forms": [
            {
              "href": "/things/lamp123/actions/toggle"
            }
          ]
        }
      },
      "href": "/things/lamp123"
    }
The WoT TD describes all the available APIs on the device. In this case we have one PropertyAffordance and one ActionAffordance.
As the name suggests, the PropertyAffordances are defined under properties and the ActionAffordances under actions.
We can get the current state of the LED by sending a HTTP GET Request to /things/lamp123/properties/state.
There is also an API to toggle the LED. It accepts a JSON object with the property state, which has to be a boolean.
Toggle the LED
Toggling the LED is quite simple. The ActionAffordance for toggle is defined as the following
{
    "actions": {
        "toggle": {
            "title": "Toggle",
            "description": "toggle the lamp on/off",
            "@type": "ToggleAction",
            "input": {
                "type": "object",
                "properties": {
                "state": {
                    "type": "boolean"
                }
                }
            },
            "forms": [
                {
                "href": "/things/lamp123/actions/toggle"
                }
            ]
        }
    }
}
So, you have to create a new POST Request with the URL http://[YOUR_IP]/things/lamp123/actions/toggle in your REST client.
Replace [YOUR_IP] with the IP address of your ESP32. The IP should be logged in the serial monitor.
You should also give the Request a reasonable title in order to identify it later again.
In my case, I gave it the title Toggle LED. The input in the WoT TD is defined as following
{
    "input": {
        "type": "object",
        "properties": {
          "state": {
            "type": "boolean"
          }
        }
    }
}
Therefore we are going to use the following JSON in our Request. Don’t forget to use application/json as Content-Type.
{
    "state": true
}
When you send the request the LED should turn on and the ESP32 should respond with a JSON which looks similar to this one
{
  "toggle": {
    "input": {
      "state": true
    },
    "status": "created",
    "timeRequested": "1970-01-01T00:00:00+00:00",
    "href": "/things/lamp123/actions/toggle/bd366dd424bbe249"
  }
}
Turning the LED off is as simple as turning it on
{
    "state": false
}
Get the LED state
The device has a PropertyAffordance in order to get the current state of the LED. The Affordance is defined as following.
{
  "properties": {
    "state": {
      "type": "boolean",
      "title": "On/Off",
      "description": "Whether the lamp is turned on",
      "@type": "OnOffProperty",
      "forms": [
        {
          "href": "/things/lamp123/properties/state"
        }
      ]
    }
  }
}
That means we have to send a HTTP GET Request to http://[YOUR_IP]/things/lamp123/properties/state in order to get the current state of the LED.
Replace [YOUR_IP] with the IP address of your ESP32.
The response should look like this
{
  "state": false
}
Congratulations your Web of Things LED works. You can now use libraries which implement the Web of Things Scripting API in order to use the device in a programmatic way.